Creative Developer Tools Progress

Creative Developer Tools (CRDT) is taking shape!

The ExtendScript version (CRDT_ES) is now quite functional and usable.

I’ve used one of my old ‘free’ ExtendScripts (SizeLabels) as a real-life test, and wrapped it up as a CRDT package, using a lot of the code-signing, encryption, licensing, trialware, installer… features of CRDT to make it into a ‘real’ project that could start generating some revenue.

A more in-depth developer perspective on how I used CRDT to repackage SizeLabels in this YouTube video:

https://youtu.be/rn9VQOEHDTM

CEP Extensions: Packaging/Code Signing/Encrypting in CRDT

The next subproject I’ll be tackling in CRDT are CEP extensions.

All the CRDT for ExtendScript features are already available in CEP extensions – so the monetization and other features offered by CRDT can already be integrated and used.

But there is more work to do.

The next goal is to reduce the friction related to code signing, packaging and encrypting CEP extensions

If all goes according to plan, PluginInstaller will handle both the packaging (by the developer) and installing (by the end-user) of CEP extensions.

It will transparently handle both the ‘mock’ code signing (CEP code signing) enforced by Adobe as part of its security theater, and will add a layer of ‘real’ code signing on top of that (CRDT code signing).

And of course, CRDT will provide a developer with the features they need to monetize their work.

CEP Code Signing – ucf.jar

PluginInstaller needs to handle the CEP code signing, so I’ve been doing some research, and I’ve discovered that the good old ucf.jar in the crusty old Adobe signingtoolkit can be made to work and can jpackage-d with a recent Java JDK.

I’ve got it working on my M2 Mac, and will now integrate it into PluginInstaller.

I am hopeful this will allow me to enhance PluginInstaller to transparently manage CEP code signing

PluginInstaller will then automatically create the self-signed key and sign your extension, making the creation of a package just a little bit easier.

CEP Extensions: Packaging/Code Signing/Encrypting

The aim is for PluginInstaller to transparently handle two types of code-signing, and a layer of encryption.

  • on one hand handle the Adobe-enforced CEP code signing
  • additionally, and independently, it will handle CRDT code signing, which depends on a registry of public keys to keep track of developers and their signatures.
  • it will also handle CRDT code encryption which is an AES-256-based encryption meant to replace JSXBIN.

CEP Code Signing

The whole bother with Adobe enforcing developers to sign CEP extensions is nothing but security theater. By making PluginInstaller handle this, I can remove another hurdle for CEP extension developers.

These signing keys are not verified in any which way by the Creative Cloud apps, so anyone can create their own key and sign anything and the Creative Cloud software will accept it, sight unseen.

Any hacker can claim to be anyone else, and create a self-signed key to ‘prove’ it to the Creative Cloud apps, and the Creative Cloud apps will happily take them at their word.

Nothing stops a malicious hacker from unzipping someone’s genuine .zxp, adding some malware to it, and re-package it with their own self-signed key.

CRDT Code Signing

CRDT code signing requires developers register their identity in a registry, so the PluginInstaller can verify their signature.

When a developer creates a developer account in PluginInstaller, a public/private key pair is automatically generated and the public key is published in the registry.

Developers retain their own private key locally, and PluginInstaller will use the private key to code-sign their scripts and data files when it packages the software.

CRDT Code Encryption

Additionally, CRDT also implements CRDT code encryption. This allows developers to protect their code from prying eyes. This is a replacement for JSXBIN as provided by ExtendScript.

What’s ahead

There is still a lot of work to be done on CRDT. Important things that are on my to-do list:

  • integrate payment processors like PayPal and Stripe. At the moment, payments are still handled manually.
  • handle packaging and installing of UXP plugins the same way ExtendScript and CEP Extensions are handled, so PluginInstaller can be a one-stop shop both for packaging (developerland) and installing (userland)

Creative Developer Tools

The first public alpha versions of Creative Developer Tools for the Adobe eco-system are now becoming available.

UXP and UXPScript are great, but for software solutions that are running in a ‘clean room’, having to fight the UXP security sandboxes can make a developer’s life miserable.

Also, handling activation/licensing for commercial software can be a pain. Creative Developer Tools can handle that for you.

Creative Developer Tools for UXP currently works with Photoshop and InDesign and provides a growing set of APIs, including APIs for reading/writing binary files and text files without artificial limitations imposed by the UXP sandbox.

See

https://github.com/zwettemaan/CRDT_UXP/blob/main/docs.md

for more info.

The crdtuxp module contains a mix of synchronous and asynchronous functions.

Some functionality is written in JavaScript as part of crdtuxp.js, and is synchronous.

Other functions are delegated to a daemon process which is able to operate outside of the UXP sandbox, but still within the confines of the logged-in user. These functions are always asynchronous.

Important note: crdtuxp steps out of the UXP security sandbox – which means that, as a developer, you need to be judicious how and when to use this.

The reality is that every software system operates in a unique context.

UXP security measures have their place and can be helpful in keeping things secure when it comes to UXP development.

However, for many software systems, these measures are too strict and overbearing and don’t account for the actual operating environment. It’s an all-or-nothing approach.

In my opinion, it should be up to the user/developer/IT department to decide how to handle security.

Sometimes a particular workflow system will be living inside a walled garden, on a disconnected network, without any contact with the outside world and will not be allowed to run any unvetted software. Or othertimes the OS security is safe enough for the particular workflow at hand.

In those cases, the UXP security measures are counter-productive: they represent unnecessary hurdles to the software development, and often make the user interface clunky and user-unfriendly.

Using UXP sandboxing should be a developer-selectable option, not an enforced ‘always-on’ requirement, and it should be up to the developer and/or the IT department to decide what is appropriate and what not.

Creative Developer Tools puts the power back into the hands of the developer, the end-user and the I.T. department, and leaves it up to them to opt-in or opt-out of the UXP security sandbox.

https://www.rorohiko.com/crdt

JSXGetURL now live

JSXGetURL enhances ExtendScript to make it easy to access servers using httphttps, sftp… – e.g. to download assets from a remote server, straight from ExtendScript. It supports InDesign, Illustrator, Photoshop,… – any Adobe software with ExtendScript support.

There is nothing to install – all you need to do is add a single //@include line to your script.

I’ve further enhanced the License Manager, and JSXGetURL 1.0.4 is now live on the Rorohiko web site.

I’ve added a feature that allows ‘sublicensing’, where you can embed an activation code for JSXGetURL into your own solution, so your end-user does not have to deal with activations.

Have a look at

https://www.rorohiko.com/jsxgeturl

Tightener

Tightener is our answer to a growing gap in automating Adobe Creative Cloud applications.

Remember the days when scripting Adobe apps didn’t require a CS degree? When people with a passion for printing, photography, or design could just jump in and start scripting? Those days seem far gone with the advent of UXP and UXPScript.

That’s where Tightener steps in. We’re gradually winding back the clock, making scripting approachable again, especially for those who have the domain knowledge and the know-how but don’t feel compelled to get a degree in computer science as well.

Tightener is a toolbox for developers, easing everything from script writing to monetization, from inter-app communication to usage tracking. It’s a diverse platform, and we’re just scratching the surface.

And for small developers and not-for-profit: Tightener is free for you! We’re all about empowering small developers, handling the nitty-gritty of activations and metrics, so you can focus on what you do best.

The goal is to make other small developers successful and let Tightener rise along with them.

This release marks the debut of the licensing/activation module in the Tightener toolkit.

It’s fresh off the press and in a ‘stable alpha’ state. Yes, there are a few rough edges, but it’s ready for action.

I have integrated Tightener’s activation/licensing logic into JSXGetURL. From 2024 onwards, JSXGetURL will be a commercial product:

https://www.rorohiko.com/jsxgeturl

Note 12-Feb-2024: the next in line is Creative Developer Tools:

https://www.rorohiko.com/crdt

Why am I using JSXGetURL for the debut of Tightener? JSXGetURL is the perfect test bed – a modest user base, all fellow developers.

In the coming months, I’ll be converting some more of the commercial Rorohiko tools and scripts to incorporate the Tightener activation/licensing system.

I invite you to take JSXGetURL for a spin. Without activation, it starts in demo mode, so you can explore without cost.

If you hit a snag or have suggestions, drop me a line.

Curious about Tightener? More (currently somewhat outdated) info on github:

https://github.com/zwettemaan/TightenerDocs

In the coming months I’ll be updating and expanding the wiki, writing a lot of new and updated documentation here – for example, how to use the licensing/activation features in your own scripts.

JSXGetURL 2024 Update

JSXGetURL

I’ve just rolled out JSXGetURL 1.x.x; it’s now stepping into the commercial arena.

JSXGetURL enhances ExtendScript to make it easy to access servers using httphttps, sftp… – e.g. to download assets from a remote server, straight from ExtendScript.

There is nothing to install – all you need to do is add a single //@include line to your script.

You can get more info and download JSXGetURL from the Rorohiko web site:

https://www.rorohiko.com/jsxgeturl

JSXGetURL works with any Adobe Creative Cloud application that has ExtendScript support – InDesign, InDesign Server, InCopy, Illustrator, Photoshop…

You can obtain individual JSXGetURL seats for US$49/year.

To purchase and activate, you need to use the License Manager which is included in the Helpers subfolder.

Create an account by clicking the New button, lower right-hand corner, and choose an unlock code.

Register the account, then use the Store window to access the JSXGetURL catalog entry.

Save and then email a purchase order to [email protected].

Payments are not handled automatically yet – you need to manually send the amount by way of PayPal, to recipient [email protected].

If you get stuck, please reach out to [email protected] or [email protected]!

JSXGetURL 0.1.0

Note 12-Feb-2024: This post is outdated. Read about the latest JSXGetURL here:

https://www.rorohiko.com/jsxgeturl

JSXGetURL enhances ExtendScript to make it easy to access servers using http, https, sftp… – e.g. to download assets from a remote server.

JSXGetURL is meant to work with any Adobe Creative Cloud application that has ExtendScript support – InDesign, InDesign Server, InCopy, Illustrator, Photoshop…

JSXGetURL is implemented as an ExtendScript DLL/framework, written in C/C++.

This DLL allows you to access URLs (including https: or ftp:) straight from ExtendScript.

There is nothing to install – all you need to do is //@include a .jsx file which then loads the DLL.

Sample code:


//@include "JSXGetURL/JSXGetURLLoader.jsx"
var getURL = JSXGetURL();

getURL.addRequestHeader("Accept: */*");
var s = getURL.get("https://www.rorohiko.com") + "";

alert(s.substr(0,1000));

var headers = getURL.getResponseHeaders();
alert(headers);

// Some random FTP file for testing

var f = new File("~/Desktop/sha512.sum");
var s = getURL.get("ftp://cygwin.com/pub/gcc/sha512.sum", f.fsName);

// Some zip file to test binary file download

var f = new File("~/Desktop/FrameReporter.1.1.8.zip");
getURL.get("https://www.rorohiko.com/downloads/FrameReporter.1.1.8.zip", f.fsName);

The previous 0.0.9 version was time-bombed for June 30, 2023 – which is 6 days from now, as of this writing.

Version 0.1.0 runs until Dec 31, 2023 and can be downloaded here:

https://www.rorohiko.com/downloads/rr516001/JSXGetURL.0.1.0.zip

I am still working on the licensing functionality in Tightener, which will ultimately be used to elevate JSXGetURL to a commercial product.

No firm decisions have been made yet, but come 2024, the licensing model for JSXGetURL will probably be a yearly recurring per-workstation fee, somewhere around US$30.

JSXGetURL versions for InDesign Server will be a fair bit more expensive.

Unlimited licenses will probably also be available, based on some yearly fee of a low multiple of US$1000.

All of this is still very much undecided – more later!

Preparing for ‘Pragmatic Extension Development’ workshop

To get the most out of my workshop ‘Pragmatic Extension Development’ in Phoenix, Arizona on June 7th, attendees can make some preparations.

https://creativeproweek.com/phoenix-2023/creative-developers-summit/
(click link, scroll down to ‘Sessions’)

If any of the tasks listed below are unclear, or too daunting, don’t worry – I’ll take you through it at the workshop. Try to get as far into it as you can.

You need the Creative Cloud app installed, and the latest version of InDesign, and a few more Creative Cloud apps. Even though I’ll be using InDesign a lot, most of the material in the workshop applies to all ExtendScript-enabled or UXP-enabled Creative Cloud apps.

You need to have basic command-line git software installed, as well as a recent version of Node.js (https://nodejs.org/en).

On Mac, I recommend installing Homebrew (https://brew.sh/) or a similar package manager, and then using brew to install various necessary components like gh or node

You should also install the Github command-line tool gh (https://cli.github.com/).

A GUI client for git is also helpful. I use both
SourceTree (https://www.sourcetreeapp.com/)
SmartGit (https://www.syntevo.com/smartgit/).

You also need Visual Studio Code (https://code.visualstudio.com/) – not to be confused with Visual Studio. If you’re on an M1 Mac, you must install the Intel version or the Rosetta version, and run it in emulation mode.

Install the following extensions:
https://marketplace.visualstudio.com/items?itemName=Adobe.extendscript-debug

If you’re on Windows, you also want the old ExtendScript Toolkit (in the Creative Cloud App, bring up the settings, then Apps then enable Show Older Apps, then install ExtendScript Toolkit)

Clone the repositories:

https://github.com/zwettemaan/UXPScriptSparker

and

https://github.com/zwettemaan/CEPSparker

somewhere on your computer, using your favorite git tool.

Please revisit this page regularly in the coming days – I might add some more ”things to do’ to it as I come to think of them.

Software registration and licensing control with Tightener

What this is

Goals

Software registration and licensing control with Tightener

As part of the Tightener automation glue (TightenerDocs), I want to design a system that would allow software developers and scripters to handle licensing and tracking of their software.

This system would provide the following features:

  • Provide unique GUIDs for users of the software
  • Provide unique GUIDs for ‘capabilities’ – think ‘licenses’, or ‘permissions’.
  • Uniquely identify individual computers (properly handle clones of computers – e.g. detect cloned virtual machines or image backup restores)
  • Retain no identifiable user data in the registry

The system is based on a central registry with a https-based API which would run on the domain tgrg.net.

This registry contains the absolute minimum of data to make the system work.

It contains no identifying information for any of the users or developers, nor does it contain any information about the capabilities being issued.

The idea is that if the registry were ever to be breached by hackers, there would be no useful data to be found in the registry that could be abused.

GUIDS and hashes

The system uses both randomly generated GUIDs and 128-bit hashes that are GUID-like.

I’ll use the term GUID in both cases – i.e. the hashes are calculated GUIDs and the rest are randomly generated GUIDs.

Software developer: generating a capability file

A software developer wants to grant a license to some other user.

Both the developer and the user are registered with the Tightener registry, and have an identifier – a calculated entityGUID.

An entity might register multiple times, and have multiple entityGUID.

The developer has some ‘out-of-band’ communication with their customer – they might be selling software via a website, or might be in email contact, or something else…

The developer handles operations like payments, issuing,… any way they want.

At some point in time, the developer and the user will have reached an agreement for the developer (the issuer) to grant the user (the grantee) some capability (e.g. a license to the software).

The developer will then create a data structure which encodes whatever data they need to pass to their software when it is running on the user’s computer.

E.g. they might have

  • settings to have certain features enabled/disabled
  • a maximum count of transactions allowed
  • a registered name that needs to be watermarked into the output
  • some segment piece of code that the software needs to run
  • encrypted data, which only the developer’s own software can decrypt

Tightener does not care whatever this data is.

The developer’s data structure is added to a capability wrapper file.

The developer then registers a calculated GUID-like hash of the file with the Tightener registry (called a capabilityGUID).

Finally, they also send a copy of the file to the user.

Registering the capability wrapper file with the registry will only store a hash of that file into the Tightener registry.

The file itself is not stored in the registry, and the registry has no knowledge of the contents of the file. All it knows is the existence of the file, not the contents, nor who created it or who the grantee is.

Capability Slots

In the end, the user ends up with a copy of the capability wrapper file.

The Tightener registry knows about the existence of the file but does not know what its contents are.

Each one of these registered capability wrapper files represents a unique ‘capability slot’ in the registry.

Any such slot can only be assigned to a single computer.

The end-user cannot re-use the capability on multiple computers.

If the software developer allows this, they user can ‘shift’ the capability from one computer to another, but they cannot use it on two computers at the same time.

User registrations

Any entity (user, company, developer,…) needs to be registered with the Tightener registry.

This registration entails no more than a calculated GUID and a public encryption key.

The entities themselves need to hold on to the corresponding private keys.

In other words, the stored data in the registry is very ‘thin’.

No identifiable data is stored in the registry – just a GUID, a public key and a time stamp.

There is more data linked to the entityGUID (e.g. a name, password, address,…) but none of that data is ever stored in the registry.

The additional user data associated with the entityGUID is only known to the entity themselves (i.e. they have the data in store and can prove to any third party that this data matches the entityGUID).

In the registry, the only footprint of an entity is a GUID, a corresponding public encryption key and a time stamp.

Machine registrations

Any computer in the ecosystem needs to be registered in the Tightener registry.

Again, this data is very thin. Each machine is identified in the registry by a long-term-persistent generated registryMachineGUID.

This generated registryMachineGUID is used to tie capability slots to individual machines.

A capability slot can be either empty, or contain a hash which combines registryMachineGUID, capabilityGUID and granteeGUID.

The registry is not meant to have any knowledge of the granteeGUID.

To accomplish that, the protocol uses a value capabilityGranteeHash = hash(capabilityGUID + granteeGUID) which is provided to the registry by the remote machine during the capability verification process.

Assigning a machine to a capability slot is done by putting

hash(registryMachineGUID + capabilityGranteeHash)

in a field of a record of the capabilitySlot database table on the registry.

This allows the registry to verify whether a particular registryMachineGUID is assigned to a particular capability slot.

Once registered, machines have three generated GUIDs, each useful within a different context.

There is a long-term stable registryMachineGUID which is internal to the registry. Only the registry uses and has access to these.

There is a long-term stable localMachineGUID which is internal to the machine itself. It is not stored in the registry, only the local machine has access to these.

Then there is a short-term, unstable machineLinkGUID which is stored on the machine itself as well as in the registry. It is used to communicate about the machine between registry and the machine.

At any one time, one machine will only have one unique registryMachineGUID, one unique localMachineGUID and one unique machineLinkGUID.

The machineLinkGUID will occasionally be replaced to handle various external circumstances.

The machineLinkGUID helps detect cloning of machines: because they’re clones, cloned machines will start out with a duplicate of the parent machine’s machineLinkGUID.

This is detected by the registry, after which the cloned machine will automatically be assigned a new, different registryMachineGUID, a new localMachineGUID and a new machineLinkGUID.

Verifying a capability

When some software launches on the user’s computer, it can interact by way of the local Tightener bus with the locally running Tightener Registry Node, which handles the protocols and interaction with the Tightener registry.

The Tightener Registry Node needs access to the local copy of the capability wrapper file and the computer’s local data store.

The Tightener Registry Node interacts with the tgrg.net Tightener registry, and depending on the result, it will either decrypt the capability data (if the capability is granted) and pass it to the software, or it will return an error (if the capability is not granted).

The software can then do whatever it wants to do based on that result (e.g. switch to demo mode, bail out, add the watermark to the output, limit the number of produced files,…)

Tables in the registry

All the data in the Tightener registry consists of three tables:

Entities (users, companies, developers…):

entityGUID
entityPublicKey
entityEmailHash
registryTimestamp 

Capability slots:

capabilityGUID
hash(registryMachineGUID + capabilityGranteeHash)
registryTimestamp 

Machine registrations:

registryMachineGUID
machineLinkGUID 
registryTimestamp 

Denial-of-Service prevention:

entityGUID
issuerCount
granteeCount
registryTimestampStart
registryTimestamp

There is no readable data in the registry – any and all readable data is retained on individual’s computers.

All registryTimestamp in the database tables are based on the clock of the registry. They record the time of the last update to the table.

The Denial-of-Service prevention table contains temporary data (i.e. records get wiped after a period of non-activity for an entityGUID, e.g. after a day). It helps detect rogue entityGUIDs that are re-occurring abnormally fast and furious.

Hardware GUID

Tightener can calculate a hardwareGUID for the computer it is running on.

The only purpose of the hardwareGUID is to detect a possible configuration change in the computer or its surroundings.

The hardwareGUID is not used to identify computers and the hardwareGUID does not need to be stable or globally unique. Collisions are not a concern.

The hardwareGUID is never sent to the registry.

This calculated GUID is a hash which combines a bunch some contextual factors. Things like

  • Ethernet MAC address
  • RAM size
  • computer name
  • operating system and version

These external factors will be chosen to be somewhat stable over time.

Changes should preferably only occur occasionally, over time spans of months, weeks or days. A calculated hardwareGUID will hopefully remain the same for some period of time.

Registry API (POST, not GET)

The registry API is used by the locally running Tightener Registry Node which handles the https-based protocol interaction with the central Tightener registry to support all Tightener-enabled nodes (softwares) on the computer.

Any third-party software using the Tightener system will use the Tightener messaging bus to interact with the locally running Tightener Registry Node.

Below some information about how the Tightener Registry Node goes about its business.

The Tightener registry is an entity

The Tightener registry itself is also considered an entity and also has a corresponding entityGUID and a public key in the registry.

This key is needed by any Tightener Registry Node interacting with the Tightener registry to be able to encrypt and decrypt data being sent to/from the registry.

Encryption

All communication with the registry uses POST interactions over https.

The certificate of the registry is on the tgrg.net domain.

This helps the remote computers ascertain they are really talking to the actual registry and not an imposter.

All data that is sent from the Tightener registry into a remote machine is encrypted with the Tightener registry’s private key. The receiving machine decrypts the data using the public key for the Tightener registry.

All data sent from a machine to the Tightener registry is encrypted using the Tightener registry public key.

Only the registry software can then decrypt this data using its private key.

Scenario: fetch the registry’s public key

https://tgrg.net/publickey`

This returns

{ 
    entityGUID: <GUID>,
    key: <publickey>
}

where entityGUID is the entityGUID assigned to the registry itself.

Scenario: Check computer registration

https://tgrg.net/registermachine

At certain times (e.g. startup, every day,…) Tightener on the remote machine will read local preferences from an encrypted local prefs file.

It retrieves the following data from the local store (if any):

hardwareGUID 
machineLinkGUID
registryTimestamp 
localMachineGUID

If localMachineGUID is empty, a random GUID is generated. This GUID will be persisted in local storage.

Tightener then recalculates a hardwareGUID in order to detect changes in the environment.

If a change is detected, or if a certain amount of time has passed since the last verification it will reach out to the registry and the registration is verified with the registry.

If the hardwareGUID detected an environmental change, the API call is updatemachine

https://tgrg.net/updatemachine
{ 
    machineLinkGUID: <GUID>,
    registryTimestamp: <timestamp>
} 

If no environmental change was detected, then the API call is verifymachine.

https://tgrg.net/verifymachine
{ 
    machineLinkGUID: <GUID>,
    registryTimestamp: <timestamp>
} 

If the prefs are empty (no machineLinkGUID nor registryTimestamp), the API call is newmachine

https://tgrg.net/newmachine
{}

For updatemachine and verifymachine, the registry will now look for a record that matches both machineLinkGUID and registryTimestamp.

Three scenarios can occur:

  • For newmachine or if no matching record can be found: create a new record with a random new machineLinkGUID and a random new registryMachineGUID and the current registryTimestamp.
  • For the updatemachine call: update the matching record with a new random machineLinkGUID and the current registryTimestamp.
  • For the verifymachine call: update the matching record with the current registryTimestamp.

This allows the registry to detect cloned machines: if two machines share the same machineLinkGUID, one of them will go through the verification process first, and by doing so, will modify the registryTimestamp associated with that machineLinkGUID in the registry database.

The second machine might try to use the same machineLinkGUID, but it will not be aware that the time stamp in the registry has been updated after the first machine had its interaction, so the second machine will send the wrong time stamp, and will be forcibly issued a new random machineLinkGUID and a new random registryMachineGUID by the registry.

Doing this will also sever the link to the cloned machine from any capability slots.

This API call returns a machineLinkGUID and the registryTimestamp from the updated database record.

{ 
    machineLinkGUID: <GUID>,
    registryTimestamp: <timestamp>,
    isNewMachine: <boolean>
} 

The returned machineLinkGUID will often, but not always, be different from the machineLinkGUID that was sent to the registry at the start of the verification process.

The isNewMachine field is set to true when the registry created a new registryMachineGUID and registered a new record (i.e. when a new machine or a clone was being registered)

If isNewMachine is true then the local machine will generate a new, random localMachineGUID.

The received data (machineLinkGUID and registryTimestamp), together with the recalculated hardwareGUID and the localMachineGUID are then saved into the machine’s local store, to be used again in a future verification round.

To recap:

The machineLinkGUID is a GUID that uniquely identifies the computer. This GUID is not stable over time.

The machine will be issued a new machineLinkGUID each time the computer hardwareGUID changes, or when the registry detects that the machine is a clone of another machine.

The registry tracks this machineLinkGUID and links it to a stable, long term registryMachineGUID which in turn is used to link a machine into zero or more capability slots.

The local machine has no need to know its own registryMachineGUID.

Instead, it locally persists its own localMachineGUID. This localMachineGUID is never communicated to the registry.

Scenario: Register a capability

https://tgrg.net/registercapablity

An ‘issuer’ entity (e.g. a software supplier) wants to issue a capability to another entity (e.g. a ‘user’).

In order to do so, this issuer will formulate a capability data structure.

This capability data structure is a string with a JSON-encoded data structure. It can be as simple as just a string or it can be an intricate, complex data structure.

It reflects the capability that will be granted to the user – e.g. a software license, a time-limited software license, a throughput value, watermarking info, some critical segment of code that the software needs to run, some privately encrypted data, decryption keys, any other data…

Tightener does not care about the data or the structure inside the capability data structure.

The capability is encoded as a JSON string, and then encrypted using the issuer’s private key.

This data is then embedded into a capability wrapper file, and a random generated GUID is added as salt.

capabilityWrapper = 
{ 
    issuer: <GUID>, 
    grantee: <GUID>, 
    capability: <encryptedCapability>, 
    salt: <GUID> 
} 

Calculate

capabilityGUID = hash(capabilityWrapper) 

The issuer will then registers the capabilityGUID with the registry.

This registration establishes a new capability slot in the registry.

https://tgrg.net/registercapablity 
{ 
    issuer: <GUID>,
    grantee: <GUID>, 
    capabilityGUID: <GUID> 
}

which returns

{ 
    success: <boolean> 
} 

This adds a record to the table with capability slots.

The issuer and grantee GUIDs are not stored in the main registry tables, but a temporary record is made of these GUIDs to try and detect denial of service attacks: if the same issuer or grantee gets registered many times in rapid succession, that issuer or grantee will be blocked from further capability registrations. The Denial of Service detection data is fleeting and gets wiped after some period of non-activity.

The issuer then passes a copy of the capability wrapper file to the grantee (e.g. via email, download from web server,…)

Scenario: Register User or Entity

https://tgrg.net/registeruser 

The entity (user, company, developer…) chooses or creates a identifying ‘handle’ .

This handle can be anything: a simple string or a complex JSON structure encoded into a single string.

They also pick a password. Then we calculate:

entityGUID = hash(hash(entityHandle) + hash(password)) 

The entity also creates a public/private key pair at the same time.

Finally, the entity needs to provide a currently valid email address.

This email address only needs to be valid during the registration process; it is not used afterwards.

Register with registry:

https://tgrg.net/registeruser
{ 
    entityGUID: <GUID>,
    publicKey: <Key>,
    entityEmail: <email>
} 

returns

{
     success: <boolean> 
} 

The registry also sends out an email with a registration confirmation link.

In the database table, entityEmailHash will stores a GUID-like hash of the entity’s email.

The registry will not retain the email address long term. Instead it stores a hash:

entityEmailHash = hash(entityEmail.toLowerCase()) 

However, during the pending registration process, for a short time, the entityEmailHash field will store the actual email address.

This is until the registry receives confirmation of the registration when the user clicks on a confirmation link in an email, or when a certain amount of time lapses.

If the confirmation link is not clicked within the allotted time, the record is deleted and the registration is nullified.

From the moment the registration link is clicked, the entityEmailHash field is replaced by the hash.

From then on we can still verify the validity of an email address provided by the user, but we cannot retrieve the email address from the server data.

This also offers some protection against denial of service attacks: registering the same email address twice is not possible.

Scenario: Check/Verify User

https://tgrg.net/checkuser
{
    entityGUID: <GUID> 
}

returns

{
     publicKey: <Key> 
}

Scenario: Request capability

https://tgrg.net/requestcapability 

User has a local copy of a capability wrapper file.

The computer has been registered and has a machineLinkGUID.

Some third party software in the computer needs to verify that the capability has been granted and needs access to the capability data.

The Tightener Registry Node will retrieve the local user’s entityGUID from the local storage.

There might be more than one entityGUID if the user has registered more than once with different handles – that’s allowed.

The Tightener Registry Node will verify that one of the stored entityGUID matches the grantee in the capability wrapper file.

If no matching entityGUID can be found, the user needs to ‘log in’ to the system by providing the correct handle and password which are used to re-calculate their entityGUID which should be a match to the grantee GUID.

If the user cannot provide the necessary data (e.g. don’t know the password) to make the entityGUID match the grantee GUID, then they are not ‘logged in’ and cannot use the capability.

No interaction with the registry is needed to handle a ‘log in’.

If successful, the Tightener Registry Node will then store this entityGUID in local storage as an additional valid local entityGUID entry for later use.

The Tightener Registry Node will then calculate the capabilityGUID by hashing the capability wrapper file.

Then it will make a requestcapability registry API call.

capabilityGranteeHash is calculated as hash(capabilityGUID + granteeGUID).

The registry will not be able to determine the granteeGUID from that data. It needs this capabilityGranteeHash to verify or calculate the hash used to record the occupancy of the capability slot.

https://tgrg.net/requestcapability
{
    capabilityGUID: <GUID>,
    capabilityGranteeHash: <GUID>,
    machineLinkGUID: <GUID>
}

which returns

{ 
    status: <number 0-4>,
    registryStatusTimestamp: <timestamp>,
    registryTimestamp: <timestamp>
}

registryTimestamp is the current time at the registry.

Status 0 means: the capability slot is unknown. registryStatusTimestamp is empty.

Status 1 means: the capability slot is valid, but is assigned to another computer with a different machineRegistryGUID.
registryStatusTimestamp tells the computer when the capability slot was last assigned.

Status 2 means: the capability slot is valid and is already registered to the computer making the request. All good.

Status 3 means: the capability slot is valid and is not yet assigned to any computer (i.e. it’s a brand new capability).

In case of status 1 or 3, the Tightener Registry Node will inform the software that the user might need to be queried: “This computer is not assigned to a capability slot, but there is a capability slot we can assign or override. Do you want to ‘grab’ the capability for this computer?”

It is up to the software to handle this and determine whether the user should be allowed to reassign the capability slot – e.g. the software could determine if there is enough difference between the registryTimestamp and registryStatusTimestamp

If affirmative, a further request can be made which should result in a status 2 when successful.

https://tgrg.net/overridecapability
{
    capabilityGUID: <GUID>,
    capabilityGranteeHash: <GUID>,
    machineLinkGUID: <GUID>
}

which returns

{ 
    status: <number 0-4>,
    registryStatusTimestamp: <timestamp>,
    registryTimestamp: <timestamp>
}

with the same status values as before.

After receiving a status 2, the Tightener Registry Node will then fetch the issuer’s public key from registry (using https://tgrg.net/checkuser)

It decrypts the capability from the capability wrapper using this key.

Finally, it passes the decrypted capability to the software that initiated the request.

{ 
    entityGUID: <GUID>,
    capabilityGUID: <GUID>,
    localMachineGUID: <GUID>,
    capability: {... decrypted data for use by software ...} 
}

The software now has access to a

  • unique user-assigned GUID tied to the user (entityGUID)
  • unique computer GUID (localMachineGUID)
  • capability data

The software also has access to the capabilityGUID which is a unique ID for the capability and the localMachineGUID which is a unique, stable ID for the machine.

It is up to the software developer how to use this data – e.g. the entityGUID or localMachineGUID might be used as a key in the software developer’s databases, but the Tightener registry contains none of that knowledge. Whether to retain or not retain any user info is up to the software developer. Tightener does not limit nor enforce anything in this regard.

Stuff to consider

What happens when the registry goes off-line? Need to think about some duplication or fallback. Might have some contract to allow software developers to run separate mirrors of the registry so the registry is never off-line.

Do we need a system to revoke capability slots? On registering the issuer could also provide a revokeGUID which is stored in the database. Something like:

Issuer picks a revokePassword and calculates

revokeProofGUID = hash(revokePassword + capabilityGUID) 

then calculates

revokeGUID = hash(revokeProofGUID + capabilityGUID) 

and sends this to registry along with the capability registration.

The registry would then also store the revokeGUID in the capabilitySlot record.

When issuer wants to revoke, they type in their revokePassword and recalculate the revokeProofGUID locally. Then they provide the registry with the revokeProofGUID and the capabilityGUID.

The registry then verifies that the recalculated revokeGUID is a match, and then it knows the capability slot can be deleted.

What happens when something goes wrong. For example, the connection might break during a machine verification, causing the machineLinkGUID to fail to update. Maybe we need an additional confirmation transaction at the end.

GUID contexts

There are four contexts in the protocol: local (on the user’s machine), registry (on the Tightener registry), and issuer (at the software developer’s), and software (inside the software while it runs on the user’s machine)

Most GUIDs are only known and available in a few context.

hardwareGUID: local
localMachineGUID: local, software
capabilityGUID: local, registry, issuer, software
revokeProofGUID: issuer, registry (not persisted)
revokeGUID: issuer, registry
entityGUID: local, registry, issuer (granteeGUID), software
machineLinkGUID: local, registry
capabilityGranteeHash: local, registry (not persisted)
publicKey: public
entityEmail: local, registry. Becomes a hash after completion of registration.
registryMachineGUID: registry
UXPScriptSparker

or: “Getting started with UXPScript in InDesign, and some very rough, seat of the pants speed comparisons with ExtendScript”.

2023-06-12: Important Note: the blog post below refers to InDesign 2023 18.3.

I’ve since been able to try out a prerelease of 18.4 and was shown some tweaks by Veena Datta Dasika from the Adobe team, and the timings are now very similar.

The remaining speed differences are very small and probably just statistical noise.

Repeated runs vary slightly in speed and sometimes ExtendScript gets the upper hand, sometimes UXPScript.

There are two important use cases:
– running pure JavaScript (without accessing the InDesign DOM)
– running code that accesses the InDesign DOM.

Based on my very limited, unscientific tests, I’d say that when it comes to pure JavaScript, UXPScript is a lot faster than executing the same code in ExtendScript.

InDesign DOM access was a lot slower in UXPScript in InDesign 18.3, but will be on a par between ExtendScript and UXPScript from InDesign 18.4 onwards.

UXPScriptSparker is set up to let me to run identical script code either in an ExtendScript engine or in the UXPScript engine.

When running a script with heavy InDesign DOM interaction, my rough measurements seem to indicate that running a script in the UXPScript could be about 3 times slower than running the exact same script in an ExtendScript engine.

UXPScriptSparker

To help me get my head around UXPScript and how it affects the scripting landscape around Adobe InDesign, I made UXPScriptSparker.

https://github.com/zwettemaan/UXPScriptSparker

It’s still early days, and there are a lot of loose ends to be tied and documentation to be written, but it is already working fairly well.

I started out with JSXSparker as the base, and transmogrified it into UXPScriptSparker.

JSXSparker is a generator/framework I created a few years ago to help budding scripters get started with ExtendScript.

https://github.com/zwettemaan/JSXSparker

There’s also CEPSparker:

https://github.com/zwettemaan/CEPSparker

I heavily restructured and rewrote large parts of JSXSparker to end up with UXPScriptSparker.

From past experience in the CEP environment, I have grown into the habit of writing a lot of reusable, ‘multi-purpose’ JavaScript code which can run both in ExtendScript and in CEP/JavaScript.

The disadvantage is that all my code for CEP panels looks like ‘old style’ JavaScript, but I am happy to pay that price for the convenience of reusability, having the exact same code and exact same API’s and libraries available both in ExtendScript and JavaScript.

For UXPSparker, I’ve taken a similar approach, and made it possible to write shared code that can run both in ExtendScript and UXPScript.

The UXPSparker framework contains two scaffolds: an ExtendScript scaffold, and a UXPScript scaffold. These two scaffolds take care of the nitty-gritty details of each environment and hide a lot of implementation details from the main script, allowing the script to be mostly unaware of what environment it is running in.

Part of these scaffoldings are a bunch of shared libraries and APIs, which hide differences between the environments from the main script.

For example, both scaffolds provide a method UXES.fileio.appendUTF8TextFile(), and this method works exactly the same in both scaffolds.

The ExtendScript scaffold is instrumented to use the VSCode/ExtendScript debugger, and the UXPScript scaffold can be debugged with the Adobe UXP Debugger Tool.

The useful part (i.e. the ‘meat’) of the script can be contained in one or more .js files that are written in such a way that the exact same .js file can be executed in UXPScript as well as in ExtendScript, at will.

By being careful and avoiding more modern facilities of JavaScript 🙁 , it’s possible to write reusable code that will run in either environment.

And here is where it gets interesting: as part of UXPSparker I wrote a little sample script that stretches InDesign’s muscle a bit.

This sample script creates a bunch of colored text frames and puts some text in it. Nothing special – my main aim was to have a lot of InDesign DOM interaction.

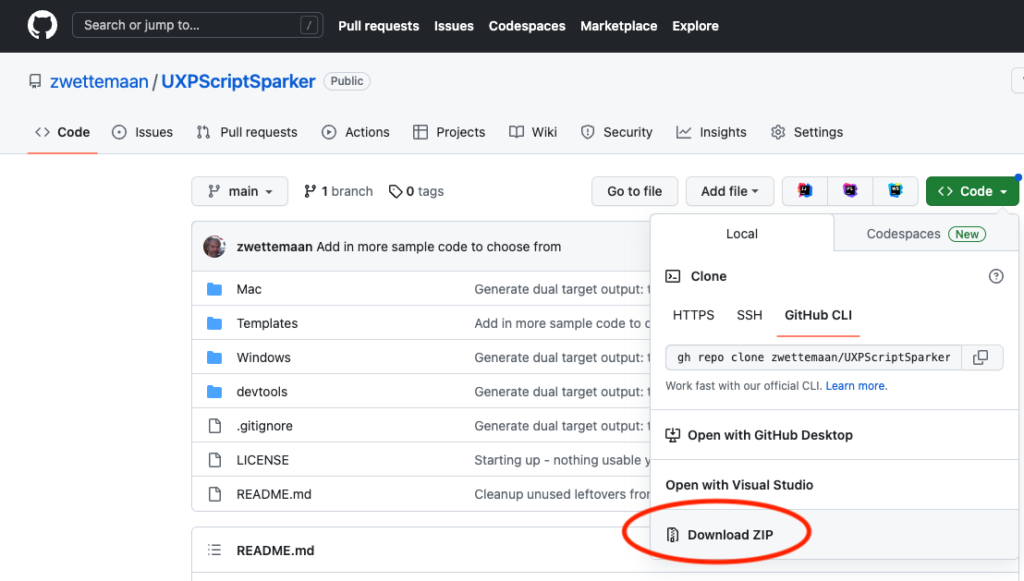
To try this out for yourself: download the UXPScriptSparker from Github:

Decompress the .zip and navigate into the Mac or Windows subfolder, depending on your platform.

On Windows you might have to contend with some blue ‘Windows protected your PC‘ warning dialogs from Windows Defender. Click More Info and Run Anyway when that happens.

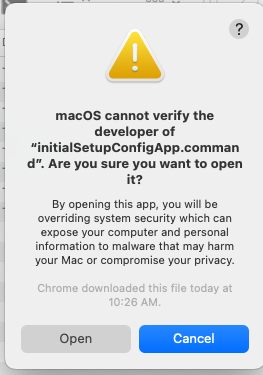
On Mac, you need to de-quarantine the software. Right-click the initialSetupConfigApp.command and then click the Open button:

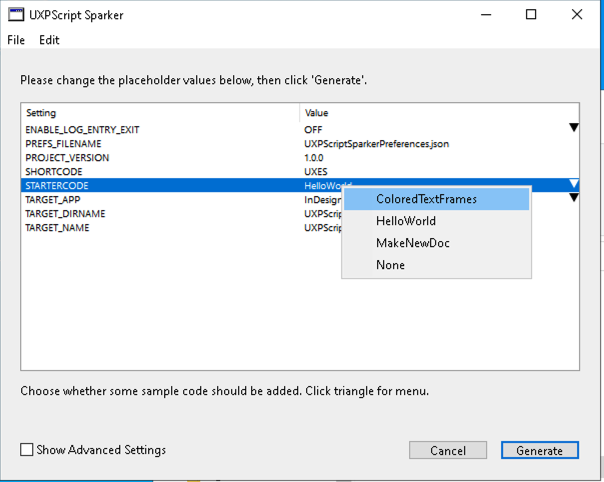
Then double-click the SparkerConfig or SparkerConfig.exe and configure the starter code. Pick the ColoredTextFrames option in the STARTERCODE dropdown.

Click Generate

If desired you can now remove the templates and retain only the generated code: navigate into the devtools folder and double-click detachFromUXPScriptSparker.bat or detachFromUXPScriptSparker.command

Now move the UXPScriptSparker-main folder into your Adobe InDesign Scripts panel. Start InDesign and select Window – Utilities – Scripts.

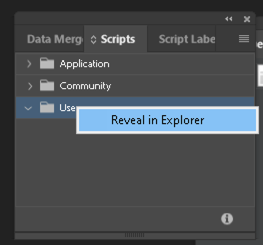
Right-click User and select Reveal in Explorer or Reveal in Finder.

Navigate into the Script Panel subfolder, and move the UXPScriptSparker-main there.

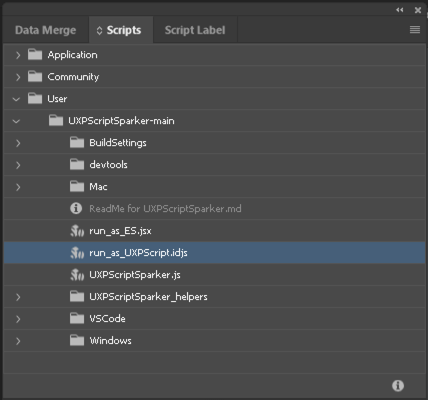
You should now see the UXPScriptSparker-main appear on the Script Panel in InDesign.

Double-click either run_as_ES.jsx or run_as_UXPScript.idjs.

Speed Comparisons

I used this sample script to run some speed comparisons, and got some surprising results.

My speed comparison was all about InDesign DOM interaction.

I fully expect UXPScript will prove to be a lot faster than ExtendScript when it comes to pure JavaScript execution speed. But pure JavaScript speed is not important to me.

In my line of work, the speed of DOM interaction is what is important: how fast can I make InDesign (or InDesign Server) do something?

Before anything else: none of these tests are very scientific, and need to be taken with a grain of salt.

I did not account for CPU speeds, numbers of cores, or amounts of memory, so comparisons between workstations don’t provide much useful info.

One thing I found is that repeatedly I got abysmally bad timings on multiple workstations.

Resetting the InDesign preferences seemed to cure that.

Not sure what exactly is going on, but clearly it’s possible for InDesign to get into some weird state where scripts run abnormally slow.

To avoid this issue, I reset the InDesign preferences on all the machines I used for testing.

All my Intel-based workstations are reasonably specced – i.e. SSDs, 32GB RAM or 64GB of RAM, and mid-range Intel CPUs. My M1 MacBook Air is a low-level model with only 7 GPU cores and 16GB of RAM.

First surprise: I found my lowly M1 MacBook Air ran rings around all my Intel-based machines, Mac and Windows alike.

Second surprise: with this particular sample script, UXPScript seems consistently about three times slower than ExtendScript in running the exact same script.

For example, it takes around 0.5s to execute the sample script with the ExtendScript engine on an M1 MacBook Air. Running the exact same script in the same instance of InDesign on the same computer with UXScript takes around 1.5s.

An Intel MacBook Pro clocks in at 2.5s running in the ExtendScript engine, and around 7.5s running in the UXPScript engine.

On one of my Windows VM machines, I got around 3.5s (ExtendScript) vs 11s (UXPScript).

So, by my rough measurements, running this particular script with heavy DOM interaction is about 3 times slower in the UXPScript engine than in an ExtendScript engine.

Creative Developer Workshop

Wednesday, June 7th. 2023, Phoenix, Arizona.

This is the day before the Creative Developer Summit, which is on June 8th.

I’ll be running an interactive, one-day advanced workshop during the Creative Pro Week: https://creativeproweek.com/

The workshop is targeted at developers working with Adobe Creative Cloud apps and will cover subjects related to ExtendScript, CEP, UXPScript and a little C++.

I know that many of you struggle with seemingly unpredictable behavior during the development and debugging of your scripts and extensions. This workshop provides you with the background knowledge you need to avoid many pitfalls and oddities.

The cost for a one-day pass for just the workshop on the 7th would be US$372.50.

This includes breakfast and networking lunches.

A two-day pass (workshop on June 7th + Creative Developer Summit on June 8th) is US$647.50.

The workshop will not be recorded, and your physical presence is required. You need to bring a laptop.

Please send expressions of interest, requests, tips, ideas to [email protected]

If you want to register, please contact me at [email protected] – I’ll give you a discount code you need to use when registering at https://creativeproweek.com/

The workshop only has room for 20 attendees. Don’t dawdle if you don’t want to miss out.

The workshop content will be flexible, and in part will be shaped by what is of most interest to the attendees. Subjects we’ll touch on:

Pragmatic Extension Development

  • DRY (Don’t Repeat Yourself): Extensive code sharing between UXPScript/ExtendScript/CEP/Node
  • Shared Service Modules: transparently call across divides into services provided in server, ExtendScript or CEP JavaScript code.
    – allow ExtendScript to call Node/JS functions
    – allow server-based code running in an iframe to call ES functions
    – …
  • Efficient debugging, e.g.
    – how to debug the startup code for a panel
    – in a single debug session, debug ExtendScript, CEP JavaScript and browser-side JavaScript, all at the same time. This technique only applies to some Creative Cloud apps.
  • Server-based panel UI for easy updating: move the UI code from locally stored ZXP into server-stored scripts. Run the panel UI from an iframe served from a remote host.
  • Test-driven code: write self-testing code
  • Write defensive, self-debugging code by adding debug instrumentation
  • CEPSparker: hit the ground running and generate full-fledged starter code for an extension for any of the Creative Cloud apps.
  • JSInterface – the counterpart to CSInterface: Tap the full power of Node/JS from ExtendScript. Make asynchronous calls from ExtendScript into Node/JS.
  • Mix and match ExtendScript, CEP JavaScript and UXPScript
  • Efficient logging

If there is interest:

  • Writing ExtendScript DLLs: how to easily enhance ExtendScript with C++.
  • TypeScript-enabled CEP development
  • Transmogrifying InDesign EPUB output
  • Interesting stuff you can do with InDesign IDML files